Implementing Seam Carving with Python
Seam carving is a novel way to crop images without losing important content in the image. This is often called “content-aware” cropping or image retargeting. Its an algorithm that lets you go from this:

to this:

As you can see, most of the important content in the image: the boats, have been left intact. The algorithm removed some of the rock formations and the water(leading to the boats appearing nearer to each other). The core algorithm is very well explained in the original paper, Seam Carving for Content-Aware Image Resizing by Shai Avidan and Ariel Shamir. In this post, I’ll talk about how to make a basic implementation of the algorithm in Python.
Overview
The algorithm works as follows:
- Assign an energy value to every pixel
- Find an 8-connected path of the pixels with the least energy
- Delete all the pixels in the path
- Repeat 1-3 till the desired number of rows/columns are deleted
For the rest of this post, we’ll assume that we are only trying to crop the width of the image, ie: remove columns. But the same concepts can be translated to rows. This will be demonstrated towards the end.
If you’re following along with the code, here are the required imports:
import sys

import numpy as np
from imageio import imread, imwrite
from scipy.ndimage.filters import convolve

# tqdm is not strictly necessary, but it gives us a pretty progress bar
# to visualize progress.
from tqdm import trange
Energy map
The first step is to compute an energy value for every pixel. The paper defines many different energy functions which can be used. We’ll use the most basic one:
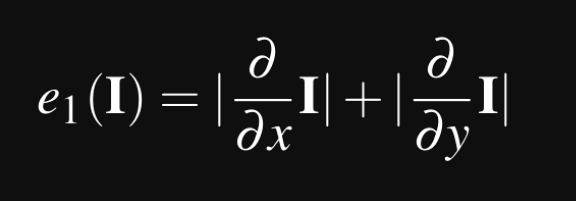
So what does this really mean? I is the image, so what this equation tells us is that, for each pixel in the image, for every channel, we perform the following:
- Find the partial derivative in the x axis
- Find the partial derivative in the y axis
- Sum their absolute values
This will be the energy value for that pixel. This brings up the question, “how do you compute the derivative of an image?”. The Image derivations page on Wikipedia points us to a number of different ways to compute the derivative of the image. We’ll be using the Sobel filter. This is a convolutional kernel that is run over the image on every channel. Here is the filter in two different directions of the image:

Intuitively, we can think of the first filter as replacing every pixel by the difference in its value on the top, to its value on the bottom side. The second filter replaces every pixel with the difference between the values to its right and the values to its left. This would capture the general trend of the pixels in that 3x3 area. In fact, this method is relatable to edge detection algorithms. Computing the energy map is fairly simple:
def calc_energy(img):
    filter_du = np.array([
        [1.0, 2.0, 1.0],
        [0.0, 0.0, 0.0],
        [-1.0, -2.0, -1.0],
    ])
    # This converts it from a 2D filter to a 3D filter, replicating the same
    # filter for each channel: R, G, B
    filter_du = np.stack([filter_du] * 3, axis=2)

    filter_dv = np.array([
        [1.0, 0.0, -1.0],
        [2.0, 0.0, -2.0],
        [1.0, 0.0, -1.0],
    ])
    # This converts it from a 2D filter to a 3D filter, replicating the same
    # filter for each channel: R, G, B
    filter_dv = np.stack([filter_dv] * 3, axis=2)

    img = img.astype('float32')
    convolved = np.absolute(convolve(img, filter_du)) + np.absolute(convolve(img, filter_dv))

    # We sum the energies in the red, green, and blue channels
    energy_map = convolved.sum(axis=2)

    return energy_map
Upon visualizing the energy map, we see:
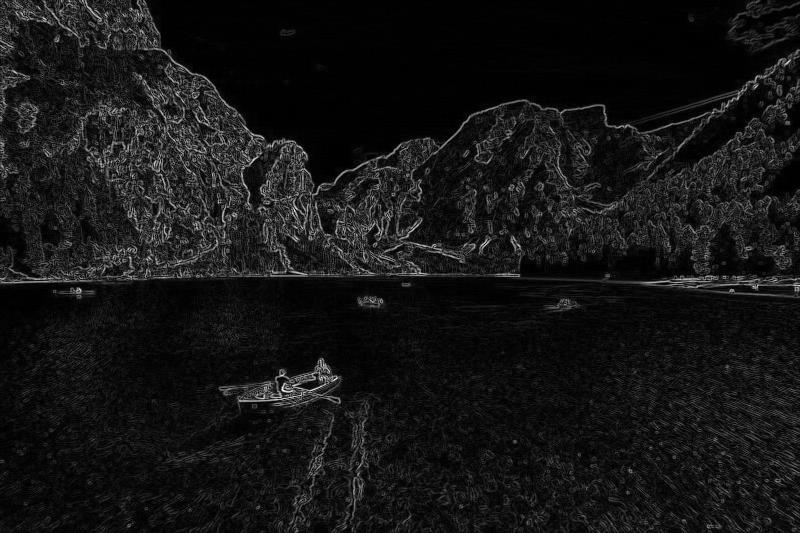
Clearly, the areas with minimal variation, such as the sky, and the still parts of the water, have very low energy(dark). When we run the seam carving algorithm, the lines removed with tend to closely associate with these parts of the image, while attempting to preserve the high energy parts(light).
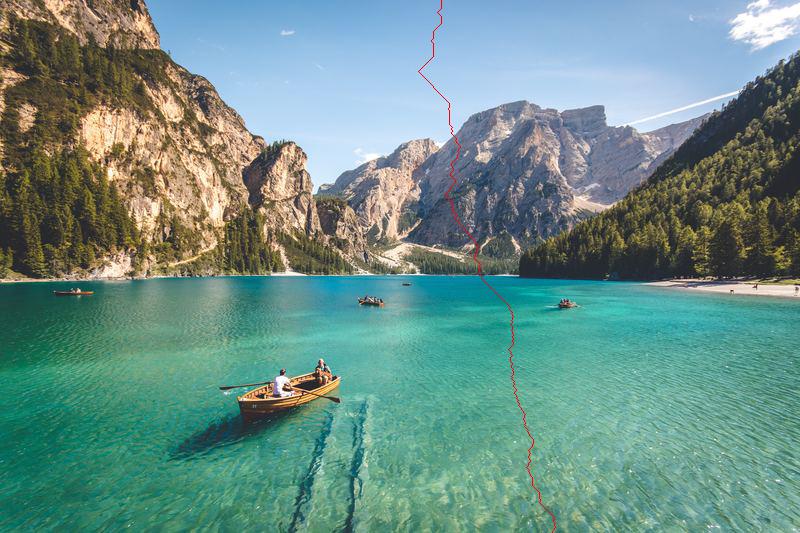
Finding the seam with least energy
Our next objective is find a path from the top of the image to the bottom of the image with the least energy. This line must be 8-connected: this means that every pixel in the line must be touched the next pixel in the line either via an edge or corner. For this example, it is the red line in this:
So how do we find this line? Turns out, this problem translates well to dynamic programming concepts!

Lets create a 2D array call M to store the minimum energy value seen upto that pixel. If you are unfamiliar with dynamic programming, this basically says that M[i,j] will contain the smallest energy at that point in the image, considering all the possible seams upto that point from the top of the image. So, the minimum energy required to traverse from the top of the image to bottom will be present in the last row of M. We need to backtrack from this to find the list of pixels present in this seam, so we’ll hold onto those values with a 2D array call backtrack.
def minimum_seam(img):
    r, c, _ = img.shape
    energy_map = calc_energy(img)

    M = energy_map.copy()
    backtrack = np.zeros_like(M, dtype=np.int)

    for i in range(1, r):
        for j in range(0, c):
            # Handle the left edge of the image, to ensure we don't index -1
            if j == 0:
                idx = np.argmin(M[i - 1, j:j + 2])
                backtrack[i, j] = idx + j
                min_energy = M[i - 1, idx + j]
            else:
                idx = np.argmin(M[i - 1, j - 1:j + 2])
                backtrack[i, j] = idx + j - 1
                min_energy = M[i - 1, idx + j - 1]

            M[i, j] += min_energy

    return M, backtrack
Deleting the pixels from the seam with the least energy
Then, we remove the seam with the lowest energy, and return a new image:
def carve_column(img):
    r, c, _ = img.shape

    M, backtrack = minimum_seam(img)

    # Create a (r, c) matrix filled with the value True
    # We'll be removing all pixels from the image which
    # have False later
    mask = np.ones((r, c), dtype=np.bool)

    # Find the position of the smallest element in the
    # last row of M
    j = np.argmin(M[-1])

    for i in reversed(range(r)):
        # Mark the pixels for deletion
        mask[i, j] = False
        j = backtrack[i, j]

    # Since the image has 3 channels, we convert our
    # mask to 3D
    mask = np.stack([mask] * 3, axis=2)

    # Delete all the pixels marked False in the mask,
    # and resize it to the new image dimensions
    img = img[mask].reshape((r, c - 1, 3))

    return img
Repeat for every column
All the ground work has been done! Now, we simply run the carve_column function again and again until we’ve remove the desired number of columns. We create a crop_c function which takes as input the image, and a scale factor. If the image is of dimensions (300, 600) and we want to reduce it to (150, 600), we’d pass 0.5 as scale_c.
def crop_c(img, scale_c):
    r, c, _ = img.shape
    new_c = int(scale_c * c)

    for i in trange(c - new_c): # use range if you don't want to use tqdm
        img = carve_column(img)

    return img
Putting it all together
We can add a main function to call it from the command line:
def main():
    scale = float(sys.argv[1])
    in_filename = sys.argv[2]
    out_filename = sys.argv[3]

    img = imread(in_filename)
    out = crop_c(img, scale)
    imwrite(out_filename, out)

if __name__ == '__main__':
    main()
And run it with:
python carver.py 0.5 image.jpg cropped.jpg
cropped.jpg should now contain this image:
What about rows?
Well, we could go about working out how to change our loops to switch the axes. Or…just rotate the image and run crop_c!
def crop_r(img, scale_r):
    img = np.rot90(img, 1, (0, 1))
    img = crop_c(img, scale_r)
    img = np.rot90(img, 3, (0, 1))
    return img
Adding this to the main function, we can now crop rows as well!
def main():
    if len(sys.argv) != 5:
        print('usage: carver.py <r/c> <scale> <image_in> <image_out>', file=sys.stderr)
        sys.exit(1)

    which_axis = sys.argv[1]
    scale = float(sys.argv[2])
    in_filename = sys.argv[3]
    out_filename = sys.argv[4]

    img = imread(in_filename)

    if which_axis == 'r':
        out = crop_r(img, scale)
    elif which_axis == 'c':
        out = crop_c(img, scale)
    else:
        print('usage: carver.py <r/c> <scale> <image_in> <image_out>', file=sys.stderr)
        sys.exit(1)

    imwrite(out_filename, out)
Run it with:
python carver.py r 0.5 image2.jpg cropped.jpg
And we can turn this:
to this:

Conclusion
I hope that was an educative and enjoyable read. I enjoyed implementing this paper, and am looking forward to building a faster version of the algorithm. A simple change would be to remove multiple seams using the same computed seams for the image. In my experiments, this can make the algorithm faster, almost linearly with respect to the number of seams removed per iteration. However, there is a noticable loss in quality. Another optimization is computing the energy map on the GPU, which was explored here.
Here is the complete program:
#!/usr/bin/env python

"""
Usage: python carver.py <r/c> <scale> <image_in> <image_out>
Copyright 2018 Karthik Karanth, MIT License
"""

import sys

from tqdm import trange
import numpy as np
from imageio import imread, imwrite
from scipy.ndimage.filters import convolve

def calc_energy(img):
    filter_du = np.array([
        [1.0, 2.0, 1.0],
        [0.0, 0.0, 0.0],
        [-1.0, -2.0, -1.0],
    ])
    # This converts it from a 2D filter to a 3D filter, replicating the same
    # filter for each channel: R, G, B
    filter_du = np.stack([filter_du] * 3, axis=2)

    filter_dv = np.array([
        [1.0, 0.0, -1.0],
        [2.0, 0.0, -2.0],
        [1.0, 0.0, -1.0],
    ])
    # This converts it from a 2D filter to a 3D filter, replicating the same
    # filter for each channel: R, G, B
    filter_dv = np.stack([filter_dv] * 3, axis=2)

    img = img.astype('float32')
    convolved = np.absolute(convolve(img, filter_du)) + np.absolute(convolve(img, filter_dv))

    # We sum the energies in the red, green, and blue channels
    energy_map = convolved.sum(axis=2)

    return energy_map

def crop_c(img, scale_c):
    r, c, _ = img.shape
    new_c = int(scale_c * c)

    for i in trange(c - new_c):
        img = carve_column(img)

    return img

def crop_r(img, scale_r):
    img = np.rot90(img, 1, (0, 1))
    img = crop_c(img, scale_r)
    img = np.rot90(img, 3, (0, 1))
    return img

def carve_column(img):
    r, c, _ = img.shape

    M, backtrack = minimum_seam(img)
    mask = np.ones((r, c), dtype=np.bool)

    j = np.argmin(M[-1])
    for i in reversed(range(r)):
        mask[i, j] = False
        j = backtrack[i, j]

    mask = np.stack([mask] * 3, axis=2)
    img = img[mask].reshape((r, c - 1, 3))
    return img

def minimum_seam(img):
    r, c, _ = img.shape
    energy_map = calc_energy(img)

    M = energy_map.copy()
    backtrack = np.zeros_like(M, dtype=np.int)

    for i in range(1, r):
        for j in range(0, c):
            # Handle the left edge of the image, to ensure we don't index a -1
            if j == 0:
                idx = np.argmin(M[i-1, j:j + 2])
                backtrack[i, j] = idx + j
                min_energy = M[i-1, idx + j]
            else:
                idx = np.argmin(M[i - 1, j - 1:j + 2])
                backtrack[i, j] = idx + j - 1
                min_energy = M[i - 1, idx + j - 1]

            M[i, j] += min_energy

    return M, backtrack

def main():
    if len(sys.argv) != 5:
        print('usage: carver.py <r/c> <scale> <image_in> <image_out>', file=sys.stderr)
        sys.exit(1)

    which_axis = sys.argv[1]
    scale = float(sys.argv[2])
    in_filename = sys.argv[3]
    out_filename = sys.argv[4]

    img = imread(in_filename)

    if which_axis == 'r':
        out = crop_r(img, scale)
    elif which_axis == 'c':
        out = crop_c(img, scale)
    else:
        print('usage: carver.py <r/c> <scale> <image_in> <image_out>', file=sys.stderr)
        sys.exit(1)

    imwrite(out_filename, out)

if __name__ == '__main__':
    main()
EDIT(5th June 2018): As shown to me by a helpful redditor, it is possible to easily achieve a massive speedup by using numba to speed up the computationally heavy functions. To do this, add @numba.jit before the functions carve_column and minimum_seam. Like:
@numba.jit
def carve_column(img):

@numba.jit
def minimum_seam(img):